Basic structure of a Web page - html, head and body
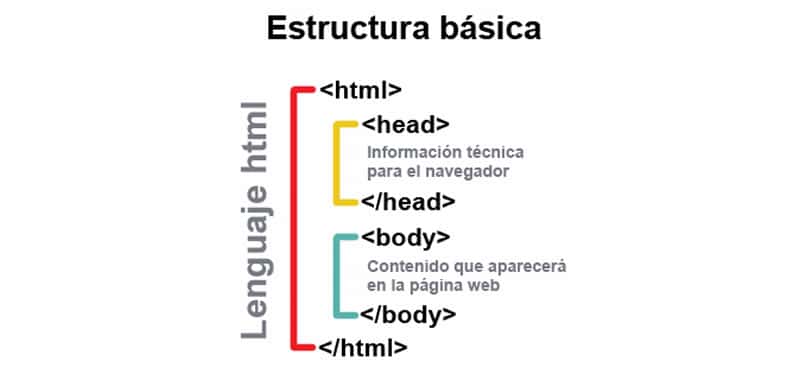
To create a web page you need an HTML document using three elements or tags major that any website uses: html, head and body.

A web document (or web page) is, as we have pointed out in the introduction, a set of HTML tags that are written in a plain text editor (without format) and run in a web browser.
The basic HTML skeleton
How to create a Web Page
To create a true HTML document you will start with three container elements:
- <html>
- <head>
- <body>
These three combine to describe the basic structure of the page:
- <html>: This element wraps all the content of the page (except the DTD)
- <head>: This element designates the header part of the document. You can include optional information about the Web page, such as the title (the browser shows it in the title bar), optional search keywords and an optional style sheet
- <body>: This element contains the content of your Web page, that is, what we want to appear in the navigation area of the browser
There is only one correct way to combine these three elements. Here is its exact placement, with the doctype at the top of the page:
<!DOCTYPE  html>
<html>
	<head>
  	...
	</head>
	<body>
		...
	</body>
</html>
Every Web page uses this basic structure. The ellipses (...) show where you would insert the additional information.
Once the XHTML skeleton is placed, you must add two more connectors to the mix
Every Web page requires a <title> element in the header section. Next, you must create a container for the text in the text body section (<body>).
A multi-use text container element is
, which represents a paragraph. Let's take a closer look at the elements that need to be added:
- <title>: Sets the title of the Web page, which has several functions. First, browsers display it in the upper part of the window. Second, when a visitor creates a bookmark for the page, the browser uses the title to tag it in the bookmarks (or bookmarks) menu. third, when the page appears in a web search, the search engine usually shows this title as the first line in the results, followed by a fragment of the content of the page.
- <p>: Indicates a paragraph. The browsers do not bleed them but they add a small space between several consecutive ones to keep them separated
Here is the page with these two new ingredients:
<!DOCTYPE  html>
<html>
	<head>
		<title>Welcome to my website</title>
	</head>
	<body>
		<p></p>
	</body>

										</html>
If you open this document in a Web browser, you will see that the page is empty, but now the title appears.

When a browser displays a Web page, the title appears at the top of the window, with the text at the end. If yours uses tabbed browsing, the title also appears in them.
As it is now, this HTML document is a good template for future pages. The basic structure is in place; you simply need to change the title and add some text.
The first thing we have to know is that in every web page there are two clearly differentiated parts: the head, or head, and the body, or body.
Let's do is create a folder, inside "My Documents", to store the test files that we will use.
We will call this folder html-tests in the rest of the exercises. With the folder open, double-click on the icon that represents the notebook.
A blank document will open.
Enter the following text:
<!DOCTYPE  html>
<html>
	<head>
		<title>Título de la página</title>
	</head>
	<body>
	</body>
</html>
When you have it written, save it in the folder with the name template.html
It is vital that the extension be .html, since only by the extension does the operating system recognize this file as a web document, and not as a simple and text file.
The name of the file should be written as it is, in lowercase and without spaces or special characters.
The only punctuation marks allowed are the point (only one), which we will use to separate the name of the extension and the underscore.
The name may contain letters and numbers, but must begin with a letter. Likewise, we will abstain from putting in the name of a file accented letters, eñes, cedillas, or any other character of a local alphabet.
Only the characters of the international alphabet (English) are allowed.
Observe the following examples:
- page 1.htm is incorrect, as it has a blank space and a capital letter
- page/1.htm is incorrect, it has a non-allowed character (the bar)
- page1-htm is incorrect, because the extension is not separated from the name by a period and because it uses a non-allowed character. (the normal script).
- page.1.htm is incorrect, because there is more than one point. Only one should be used, to separate the name of the extension
- page1.htm is correct
- page_1.html is correct
- page-1.html is correct
All of these precautions may seem excessive to you now. Most of them are really unnecessary in Windows, but do not forget that you are working on the Net.
Web servers are much more sensitive to certain aspects of the name of the files than your local machine.
Another important rule is that the files have an extension, but the folders in which we store them do not. So, in the name of a folder we will never include points.
Once you have saved your code in your folder with the appropriate name, close the notebook. In your folder, in addition to the notebook, you will see the icon that represents the file you just recorded.
Note that the icon is reminiscent of Explorer or Google Chrome (assuming one of them is your default browser).
This is because having saved the file with the .htm extension, the operating system recognizes this file as a web document (also called an html document).
If you incorrectly record the extension, the icon will be different and you will not be able to use your file as a web document.
To execute the page you just created, double-click on the icon. Automatically, the browser will open and the page will be loaded. The full path and the name of the file will appear in the address bar.
Now let's see in detail what is the code of this page that we have created and what it does.
First, we found the tag <html>. This tag is always used to start the html code.
It is the way to tell the browser that at this point the code starts. For this reason, this line is always put as the first line of the code.
We will not include any tag before this, with the exception of DOCTYPE. On the contrary, at the end of the code we have the tag </html>, which tells the browser that the code ends at that point.
We should not include any tag or anything else after this line. Note that the ending tag is the same as the start tag, but including the slash at the beginning.
Inside the html code we will find clearly differentiated the two blocks that we mentioned before: the head (header) and the body (body of the page).
Let's see the code of the header:
<head>
	<title>
		Título de la página
	</title>
</head>
Like the general code, the header has a beginning indicated by <head> and an end indicated by </head>.
Everything we want to include in the header will be placed between these two lines.
As we said before, in the header we will include some general configuration data of the page. In this template we have only included the title of the page.
The title of the page is included between the tags <title> and </title>, which indicate, respectively, the beginning and end of the title.
The title is a literal (a string of text) that will appear in the browser's title bar at runtime (when the page is executed), as shown in the following figure:

I want to emphasize that this title is only that: a free text to appear on the page and has nothing to do with the name we gave the file.
Once the head is completed, we go to the second section of the entire web page: body or body.
The body includes, as I mentioned before, everything you want to see in the navigation area.
It starts with the tag <body> and ends with the tag </body>. As we see in the file that we have created, at the moment we have not included anything
For this reason, when you run the page, you see the empty navigation area. Inside the body we will enter code and we will visualize the results.
The first thing we will do is include text on the page so that it is displayed in the navigation area.
To do this, close the browser and, within the folder in which you are working, drag the icon of template.html on the notebook. In this way, the notebook will open and load the source code you had previously typed.
In the area of the code reserved for body of the page between the lines <body> and </body>, type the following:
This is a line of text.
Therefore, your code will be as follows:
<!DOCTYPE html>
<html><
	head>
		<title>
			Título de la página
		</title>
	</head>
	<body>
		Esto es una línea de texto
	</body>
</html>
Then click on the FILE menu and, within this, choose the option SAVE AS ... make sure you save it in your folder.
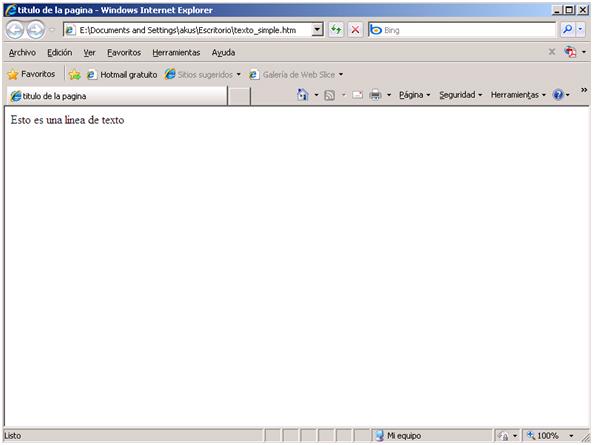
As a file name, type text-simple.html. Once saved, close the notebook and run the file by double clicking on its icon.
The result on the screen will be like the one shown:

How do you see to display a text in the navigation area, simply include that text within the body of the page.
In the next article we will learn many things about the text: its presentation, its color, etc.
CITE ARTICLE
For homework, research, thesis, books, magazines, blogs or academic articles
APA Format Reference:
Delgado, Hugo. (2019).
Basic structure of a Web page - html, head and body.
Retrieved Nov 23, 2025, from
https://disenowebakus.net/en/basic-structure-web-page


Wonderful article, full of informative content, keep posting.