Taking data from PHP pages to the base in MySQL
Users of our site can also add data to our database through forms to write something and send it to the server.

How to write data in a database from PHP
We have already made pages that read data from our database but, many times, we need to travel in reverse, that is, that our PHP pages add data to a database.
They will be, basically, two types of users that will need to add records to a table using HTML / PHP forms:
- The administrators of the content of a Web site, when they enter a private page (protected with user and password, part of the administration panel or back-end of the site), for -for example- add products to a catalog, news to a portal and similar tasks. The objective of the administrators to add this information is that it is then visualized by the visitors that enter the site, that is, they navigate using dynamic pages like the ones we learned to create in the previous topic, whose content was stored in the database. of data
- 2. Users of our site may also add data to our database in certain circumstances, when they send a comment about a news item, a message in a forum, complete their information in a registration form, that is, use HTML pages to write something and send it to the server from the front-end (the "public" pages of our site)
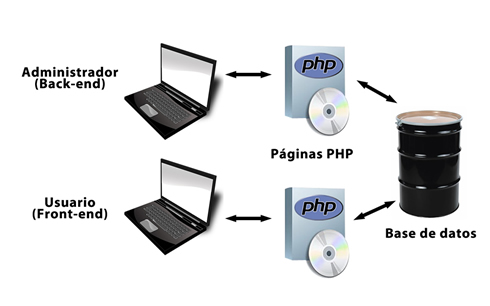
The administrator interacts with the black-end, and the user, with the front-end.
Whoever is the type of user that adds data to our database, will do so using the same technique: an HTML form to write the data on the client side (browser) and, the destination page of that form, a PHP code that, Being located on the server side, you can insert the data in the database and then return some responses to the browser.
So, we are talking about a process that has two stages or "moments":
- The initial moment where the user completes the form, on the client's side
- And the second, when a PHP page receives in the server the variables that the user completed and uses them to execute a SQL query that inserts the data of the database
Typically, this process will be divided into two different pages: an HTML file for the forms and a PHP page for the code that will run on the server, insert the data in the database and display a success or error message.
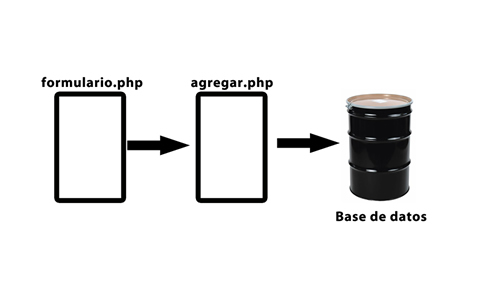
Two pages: one form sends data and another receives them and inserts them into the database.
On the second page (add.php), to insert the records in the database, the necessary steps will be:
- That the program interpreter of PHP is identified before the manager program of MySQL and select a base (we have already created a function that did this in the previous topic, so we can use it)
- Let's prepare a variable the order of the SQL language necessary to insert data in the database
- We will execute that SQL command (it will not be necessary to create a specific function to insert data, since this query does not bring data, but sends it to the base, so it is not necessary to generate or run any "data package"). We will execute the command with mysql_query directly, it will be fundamental to evaluate if it returned true or not the execution of that query and, based on it, we will show a success message (if the data was inserted) or an error message
Let's move on to the action:
Creating the form
As a first step, we will create a form that will let us write the data we want to add to the "messages" table.
This form will have two text fields, for the name and email, respectively, and a text area for the message (the id will not be inserted by the user, since it is a self-increment field).
We will call this form, form.html, and your code could be something like this:
<form method="post" action="add.php">
<fieldset>
<legend>Enter your query</legend>
<p>
<label>Enter your name:
<input type="text" name="name" />
</label>
</p>
<p>
<label>Enter your email:
<input type="text" name="email" />
</label>
</p>
<p>
<label>Enter your message:
<textarea name="message" cols="30" rows="5"></textarea>
</label>
</p>
<p>
<input type="submit" value="send"/>
</p>
</fieldset>
</form>
In addition to paying attention to the name (since they will be the names of the variables that we can read on the next page from a cell in the $_POST matrix).
The most important thing here is that the action attribute of the form is pointing to a second page called add.php; which will be the one that we will codify next.
Connection to MySQL
On the second page (that is, the page to which the action of the previous form was pointing and which we decided to name add.php), after validating if the variables were received, the PHP interpreter will try to connect to the MySQL program, and will try to select a base.
For these tasks, we had already created a function in the previous article, so let's reuse them:
<?php
// We include the connection data and functions:
include("data.php");
include("functions.php");
// We use these variables:
if(connectBase($host, $user, $password, $base)) {
// Here will go the rest
} else {
echo"<p>Service interrupted </p>";
}
?>
Of course, remember to place the files data.php and functions.php in the same folder in which we are working so that this can work.
Now, let's move on to the second step.
The INSERT command of the SQL language
Once authenticated before MySQL and selected the base, we will prepare, within a variable, the query of the SQL language that is used to insert data in a table of the base: the INSERT order.
The basic syntax of the INSERT command is the following:
INSERT INTO table (field1, field2, field3) VALUES ('value1', 'value2', 'value3');
This could be translated as "Insert in a table indicated, in the fields listed, the following values".
Let's see an example to understand it better:
INSERT INTO messages (id, name, email, message) VALUES ('0', 'Delgado', 'adrian.delgado@cuc.udg.mx', 'Bla, Bla, bla')
Observe that the values (listed in parentheses after the word VALUES) are always wrapped in single quotes, and there is a correction of order, since it will be inserted, the first field of the list (the id field, in this case), the first of the value (the 0); in the second (name), the second value (Delgado), and so on.
Note also that we have provided a zero as a value for the id field, since it will be generated automatically (we have defined it as auto-increment).
In this way we do not worry and, for all the records that we are going to insert, we will always provide a zero as the value of the id, and MySQL will be responsible for assigning the corresponding value (of course, all this thanks to the fact that we have defined the id field). as auto-increment).
Remember that we can execute SQL queries from the phpMyAdmin, by clicking on the SQL tab, writing commands in SQL language within the text area, and then pressing continue to see the result of the execution. It is recommended that we try this INSERT order several times to familiarize ourselves with it.
To this INSERT command of the SQL language, we will leave it written inside a variable, so that we can pass it as a parameter to a function that is responsible for executing it.
But we are not going to write the data there "by hand", like in the previous example, but we will have to modify this order so that it really receives the data sent from the form of the first page, for which it will remain something like what follows:
<?php
//We validate that these variables have arrived, and that they are not empty:
if (isset($_POST["name"], $_POST["email"], $_POST["message"]) and $_POST["name"] !="" and $_POST["email"]!="" and $_POST["message"]!="" ){
//we transfer to local variables, to avoid complications with the quotes:
$name = $_POST["name"];
$email = $_POST["email"];
$message = $_POST["message"];
//We prepare the SQL command
$query = "INSERT INTO messages (id,name,email,message) VALUES ('0','$name','$email','$message')";
//Here we will execute that order
} else {
echo '<p>Please complete the <a href="form.htmll">form</a></p>';
}
?>
The most important thing here is that we verify the presence of the variables, and leave them ready, ready to use within $ query.
It is very useful, at this point prior to the execution of the query, that we test what the variable $ query contains by doing an echo of it.
We can complete some test data in the form, send it, and see what the echo shows; to that it shows, we can copy it and paste it inside the SQL window of the phpMyAdmin to, in this way confirm if the syntax of the order was correct.
Recall that it is necessary to include this block of code within the previous block that made the connection to the base, in the exact part where we had prepared a comment to say: "// Here the rest will go"
Run the query
Now that we have verified that the syntax of the query is correct, we can make PHP actually execute it, by using the mysql_query function, and, in the same way as in the previous topic, we will place this query within a conditional to check if the record was actually inserted.
Observe that the following code must be inserted in the previous code point where we leave a comment that said: "// Here we will execute that order".
if(mysql_query($query)){
echo "<p>Record added.</p>";
} else {
echo "<p>Not added...</p>";
}
If after executing this, we enter the phpMyadmin, click on the left column on the name of the database courses and then click on the name of the message table, now we can click on Browse and we will see the new record that has been added to our table.
However, if by chance we write an accent or a foreign character in the text of one of the fields, we will notice that it is displayed with an incorrect coding.
Whenever we send a query that takes data to a database, we must specify the character set, which will be UTF-8, in our case, so as not to have problems with special characters (accents, years).
This will be done through the SET NAMES command.
In this case, we will apply it after the connection is established and the base is selected (immediately after the conditional that evaluates the connectBase function), in this way:
@mysql_query("SET NAMES 'utf8'");
With this, the complete process of adding records to a table from a form already works but, before using it in our sites, we will analyze a typical security problem (and we will see how to solve it) of this process of adding to the database information that was entered by some user.
Filter form data: sending SQL injection
A fundamental point when we are going to send data written by the user inside a SQL query, is to "clean" them before using them in a query that I sent them to MySQL, since some user with bad intentions can send damaging data for our database or, simply, to gain access to areas of our site that are not public, using a very popular technique, which we will analyze below in order to prevent it.
This technique is known as SQL injection (SQL injection), and consists of using a field in a form to "complement" an SQL query (SELECT, INSERT, DELETE or UPDATE).
Of course, the attackers know the SQL language very well.
Let's see an example of this technique in operation, so we can check the real risk of not "cleaning" the data written by users.
We will create a table called "users", which will have only three fields id (TINYINT), user and key (both VARCHAR). We will load a single record, a supposed "pepe" user with the key "key".
Once this simple table is created and that test record is inserted, we will create a file "form.html" in which a user can be entered and a password to access a supposed secret content:
<form method="post" action="secret.php">
<fieldset>
<legend>Enter your data</legend>
<p>
<label>Enter your user:
<input type="text" name="user"/>
</label>
</p>
<p>
<label>Enter your password:
<input type="text" name="password" />
</label>
</p>
<p>
<input type="submit" value="send"/>
</p>
</fieldset>
</from>
On the second page (secret.php), we will include, as always, the connection and function files, and we will execute a SELECT query to see if the user and the password entered by the user exist in our user table: if they do not exist , we will not let you see the "secret" content of our page.
Let's see what the code of secreto.php would be like (we have taken the example of the article "Taking data from the database in MySQL to PHP pages", so it is essential that we place all the necessary files in the same folder, as a connection. php and functions.php):
<?php
// We include the connection data and functions:
include("connect.php");
include("functions.php");
//We validate that they have sent a user and a password, and that they are not empty
if (isset ($_POST["user"],$_POST["password"]) and $_POST["user"]<>"" and $_POST["password"]<>"") {
// We move to local variables:
$user = $_POST["user"];
$password = $_POST["password"];
// We connect:
if(connectBase($host,$user,$password,$base) ){
$query ="SELECT * FROM users WHERE user='$user' AND password='$password'";
if($package=consult($query)){
echo "<p>Welcome to secret content </p>";
}
else {
echo "<p>You have no right to access our secret content </p>";
}
} else {
echo "<p>Service interrupted </p>";
}
} else {
echo '<p>You have not completed the form</p>';
}
echo '<p>Return to <a href="form.html">form</a></p>';
?>
If we try what is expressed in the previous table by typing a user and password that does not match "pepe" and "password", we will not get access to the secret content, but we will get access if we type "pepe" and "password". So far, everything seems to work perfectly...
But let's see what you will try to do that wants to enter our secret content. Being in front of the form, you will write this:
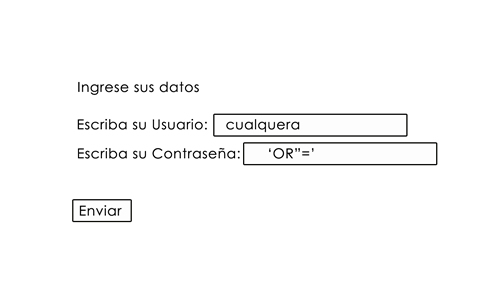
SQL code injection
Note that the content of that field will be:
' OR ' ' = '
Which becomes significant if we replace the values of the variables by the input by the user, and place it within the SQL command that will be executed below:
$query ="SELECT" * FROM users WHERE user= 'any' AND password=' ' OR ' '=' ' ";
Note that the query is radically modified; it does not matter that he has been entered in the user field (it can be anything), nor does it matter that the key has been left empty, since with his first single quote, he has closed the stretcher that was left open for the key, but then he has added: OR '' = '' which is a true statement, could also have put: OR 1 = 1, or any other tautology that causes the entire expression to be evaluated as true.
The point that is evaluated as true is that we remember ... it is being executed within the conditional, which is the only way to know if that user and that key existed in the user table.
Conclusion: this conditional will always be true for that user, who can freely enter our "secret" zone, simply by injecting the aforementioned code into our access form.
How can we avoid it? Very easily: we have a function called mysql_real_escape_string that allows us to clean up the data entered by the user, that is, change its value to another one that is harmless for the SQL queries sent to the database.
We only have to apply it to the received variables, and the risk of SQL injection disappears:
$user = mysql_real_escape_string ($_POST["user"]);
$password = mysql_real_escape_string ($_POST["password"]);
If out of curiosity we complete the form again with 'OR' '=' and then we make an echo of $ password to see what it contains, we will see that the quotes were deactivated ("escapes" with a forward slash):
\' OR' \'\'=\'
This operation makes it completely harmless because it no longer respects the syntax of the SQL language and, therefore, the user who tried this SQL injection will no longer be able to access our secret content.
Now that we can insert data in the database from our PHP pages with total security, we will learn to eliminate a database record using forms (typical task of a management panel or back-end, from which, for example, we could eliminate a message published in a forum that is offensive or that performs SPAM, eliminate a sold out product, that is no longer for sale in a catalog, etc.)
How to delete data from a database with PHP
Next, we will see the steps of the operation that deletes an entire record of our table from a Web page.
Let's go back to the example in the previous article (remember to locate the files connection.php and functions.php in the same folder).
The part that showed the list of employees was as follows:
<?php
// We include the connection data and functions:
include("connect.php");
include("functions.php");
// We use these variables:
if(connectBase($host,$user,$password,$base)){
$query = "SELECT * FROM employees";
if ( $package = consult ($query)){
// We call a function that shows that data
$codeTable = tabular($package);
echo $codeTable;
} else {
echo "<p>No data found</p>";
}
} else {
echo "<p>Service interrupted </p>";
}
?>
The key part of the loop of our function called tabular, where the HTML code of each row or tr of the list was assembled, was the following:
while ( $row = @mysql_fetch_array($data)){
$code .= '<tr>';
//Let's accumulate as many "td" as necessary:
$code .= '<td>' .utf8_encode($row["id"]).'</td>';
$code .= '<td>' .utf8_encode($row["name"]).'</td>';
$code .= '<td>' .utf8_encode($row["lastname"]).'</td>';
$code .= '<td>' .utf8_encode($row["age"]).'</td>';
$code .= '<td>' .utf8_encode($row["country"]).'</td>';
$code .= '<td>' .utf8_encode($row["spatiality"]).'</td>';
// We close a "tr":
$code .='</tr>';
}
This produced the following result:
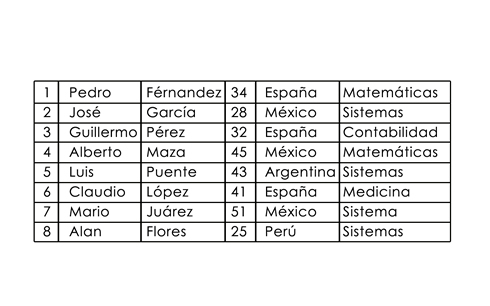
Original listing
To add to this list both the delete operation and the modify a record, add a couple of new td columns to each row, so that each one includes a link that shows the words DELETE and MODIFY, respectively.
To do this, add to the previous loop two new td at the end of the others, in this way:
$code .= '<td>DELETE</td>';
$code .= '<td>MODIFY</td>';
This aggregate, for the time being, will look like this:
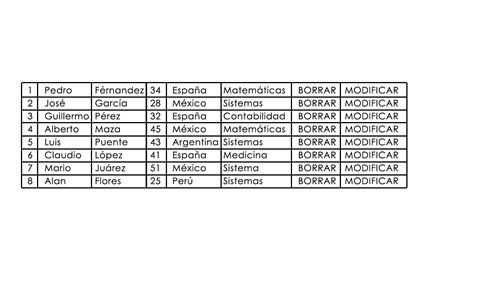
Listing with added words
For now we need that, by pressing one of these words, each of them "sent" to the server in a link (that we have not yet done) a variable with the code of the record that we want to delete or modify.
This is the way for the landing page to know "which registry" it is wanting to remove or modify.
Let's start by converting the word DELETE into a simple HTML link, pointing to a page that we will call delete.php:
$code .='<td><a href="DELETE.php">DELETE</a></td>';
When implementing this change, the list will look like this:
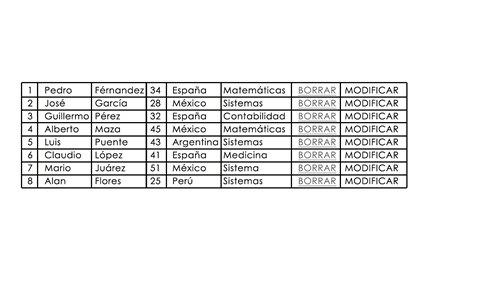
Listed with link in DELETE.
Now comes the most difficult; we need that each one of those links, when generated within the loop, obtain from $ row ["id"] the code of the record that is being assembled at that moment, and leave it inside the link, in a variable that will be sent by the get method to the next page:
$code .= '<td><a htref="DELETE.php?code='.$row["id"].'">
DELETE</a></td>';
Which will produce the next result:
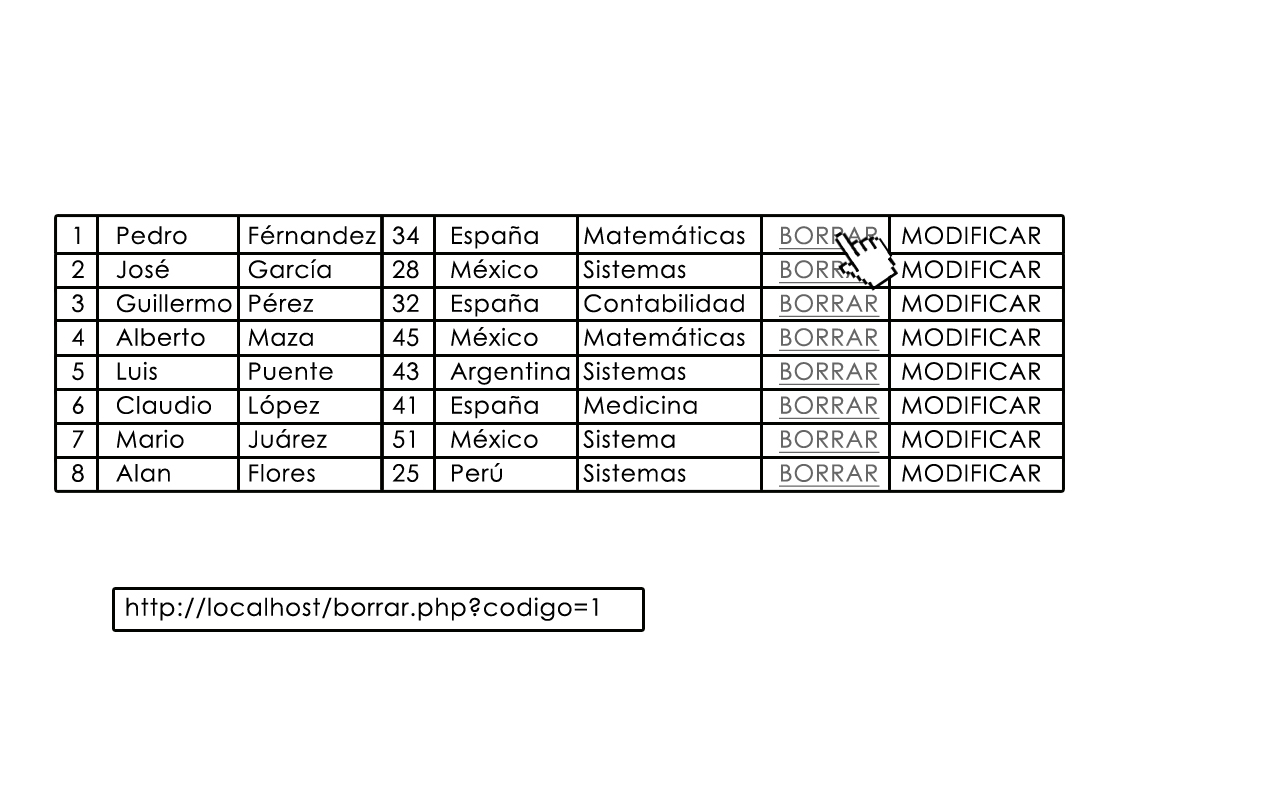
Each link with its identifier
Visually, nothing has changed in the links, but if we support the mouse pointer over each of the words DELETE (without pressing it, just sliding it over each link), we will notice in the status bar, at the foot and to the left of the browser , that each link in addition to pointing towards delete.php, when pressed will also send the variable "code" with its corresponding value.
Note that if we pass the mouse over the different words ERASE along all the lines, we will see that each line in value of the variable "code" is different, since it corresponds to the value of $ row["id"] of each record.
In this way, the landing page could know which is the record that you want to delete, with total certainty.
Now, we only need the end: create the page delete.php towards which all those links point, which is the page that will actually erase the record whose id matches the one indicated in the variable "code".
The DELETE command of the SQL language
Within the page delete.php, we should be receiving from the previous list the variable "code", which contains the id of some of the records, which you want to delete.
Of course, we must validate if it has reached the server and if it is not empty.
This could do as follows:
<?php
if(isset($_GET["code"]) and $_GET["code"]<>""){
// Here will go the rest of the instructions
} else {
echo '<p>You did not specify what you want to delete, please go back to the <a href="listing.php">listing</a></p>';
}
?>
If the variable "code" is present, we proceed to eliminate the record that has the id that it has specified and, for that, we must follow the following steps:
- That the interpreting program of PHP is identified between MySQL and select a base (we already have prepared a function that does this)
- Prepare in a variable the SQL query that we will execute, which this time will consist of the DELETE command
- Execute that order (with mysql_query, nothing new for us, and as in the insertion, it will not return data either, so it will be sufficient to evaluate the obtained result with a conditional one).
- According to the result of the conditional, we will show a message and allow the user to return to the list, to continue performing other tasks
The only point other than what we already know is the second, so we'll see what the syntax of the DELETE command is that will allow us to delete records from a table.
The structure of this SQL language command is:
DELETE FROM table WHERE field='value';
Note that the value goes in single quotes, like all the values we send to MySQL, and also note the addition of a WHERE condition.
This condition is essential in the case of a DELETE order, since it allows to restrict the application of the order to just one or more records that meet that condition, otherwise, if no condition is specified, we would delete all the records in the table complete.
Attention:
This command is the most dangerous of the SQL language: DELETE FROM table; By not having a WHERE condition, you will delete all records from the specified table.
In this case, we want to delete only one, that record that in the id field has the value specified in the variable "code", variable that the user has sent from the list when clicking "that" link, the one corresponding to "that" record that you want to erase.
Therefore, in this example, our SQL command would be thus armed:
DELETE FROM employees WHERE id='$_GET["code"]';
Order that we will place, as always, within a variable called $query.
But now a slight inconvenience arises: when wrapping the complete contents of the variable in double quotes, they will conflict with the double quotes that surround "code".
We have two ways to fix it:
- Wrap between braces the value that will be sent to MySQL, that is, the final part of the DELETE order that is wrapped in single quotes, in this case: $_GET["code"]
- Or transfer to a local variable (which does not contain quotes) the content of $_GET["code"]
In the first case (using braces), the variable $ query would look like this:
$query="DELETE FROM employees WHERE id='{$_GET["code"]}'";
In the second case (bypassing a local variable), it would be as follows:
$code=$_GET["code"];
$query="DELETE FROM employees WHERE id='$code'";
Next, we will execute this command with mysql_query, evaluating with a conditional if it returned true (true) the deletion order (that is, if MySQL could eliminate the indicated record) and, in that case, we will show the user a message of "Deleted record" "; Otherwise, we will show an error message.
For this reason, the complete code of the page borra.php would look like this:
<?php
// We include the connection data and functions:
include("connect.php");
include("functions.php");
// Verify the presence of the expected code:
if (isset($_GET["code"]) and $_GET["code"]<>""){
// We connect:
if (connectBase ($host,$user,$password,$base) ){
// We move to a local variable to avoid problems with the quotes:
$code = $_GET["code"];
$query = "DELETE FROM employees WHERE id='$code'";
if (mysql_query($query)){
echo "<p>Record removed.</p>";
} else {
echo "<p>Unable to delete</p>";
}
else {
echo "<p>Service interrupted</p>";
}
} else {
echo '<p>It has not been identified which record to delete</p>';
}
echo '<p>Back to <a href="listing.php">listing</a></p>';
?>
How to modify data from a database with PHP
THE MOST COMPLICATED FORM: THE UPDATE
We only need the most complex (or, at least, the longest) action of all, that of updating or modifying the values of a record.
We will replace within the function called tabular the line that generated the last td of the table, the one that showed the word MODIFY.
Our goal is to make that word become a link, that we send a code to a new page that we will create that will be called modify.php
This should not be a problem for us: it is the same as what we did before to delete a record, it just changes the name of the destination file of the link and the word that will be shown:
$code .='<td><a href="MODIFY.php?code='.$row["id"].' ">MODIFY</a></td>';
Which will produce the following result:
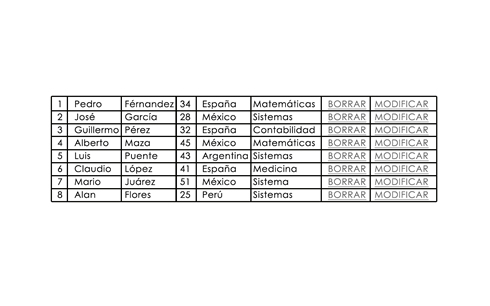
Links to modify.
But the complication is that, for the user to modify the values of the fields to his liking, an additional step is required with respect to the elimination: it is not enough to know the id of the record to "update" only, since we do not know what fields of that record the user will want to update, or what new values will he want to give him.
Therefore before updating, we must show all the data of that record, but within value attributes of fields of a form, so that their current values appear written and, once the user freely modifies what they are seeing on their screen , that data should be sent to another PHP page, which will be waiting for these new values in the server, and that is the page that will actually execute the order to update the values of that record in the database.
So all process will consist of three pages:
- The list with links (list.php)
- The page that shows a form with the data of the registry that will be modified already loaded, ready for the user to write, delete or replace what he wants (page that we can call modify.php)
- And a last page, that receives the variables of that form already modified by the user, and will execute an update query in the base (page that we will call modified.php)
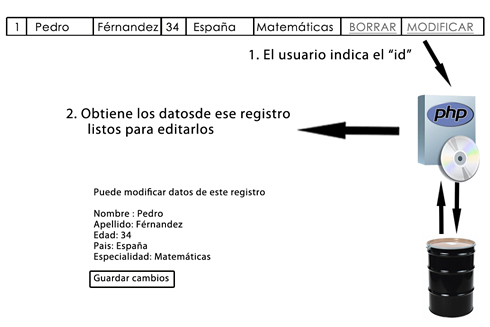
Order a form with the data included, ready to edit
Once modified in your browser, the data is sent back to the server.
As usual, on the page that is reached from the list, we will validate that a code is arriving and that it is not empty.
Next, we will do a SELECT, just like the ones we did in the previous topic with the aim of bringing from the table only the complete record that we want to modify.
Once these data are obtained, we must "write" them inside the value attributes of the fields of an HTML form. For this, we will create our own function, which we can reuse with slight variations in other projects.
Let's see how does this necessary function for the file modify.php, step by step.
To select only the indicated record, we will apply the same filter that we recently used in the DELETE command: a WHERE conditional.
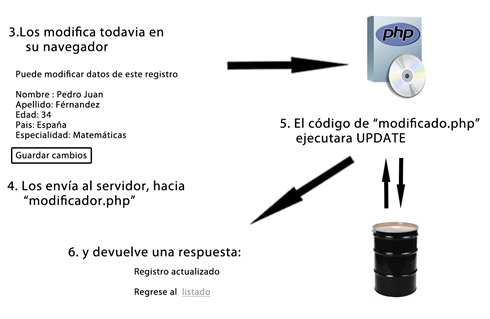
The modified data will be sent and updated in the database.
This query, once executed with the consult function that we created with the objective of executing SELECT orders (something very simple at this point) will bring us data from a single row of table, which we must assign to a "package" that we will typically call $data.
The code of this page named modify.php up to this point, could be the following:
<?php
// We include the connection data and functions:
include("connect.php");
include("functions.php");
// Verify the presence of the expected code:
if (isset($_GET["code"]) and $_GET["code"]<>""){
$code = $_GET["code"];
// We connect:
if (connectBase($host,$user,$password,$base) ){
$query = "SELECT * FROM employees WHERE id='$code'";
if ( $package = consult($query)){
// Here we will call a function that shows that data within value attributes of a form
}
else {
echo "<p>No data found</p>";
}
} else {
echo "<p>Service interrupted</p>";
}
} else {
echo "<p>It has not been indicated which registry you want to modify.</p>";
}
echo '<p>Regresar al <a href="listing.php">listing</a></p>';
?>
Now, we will create a function that we will call editRecord, whose task will be to load the values of each field of the selected record into value attributes of fields in a form.
To do this, the function will need to receive as a parameter the data packet called $ package, and must extract it to an array (which we will typically call $ row), using the well-known mysql_fetch_array function, as we did in the initial listing, but with a slight variant: this time a loop will not be necessary, since the query will undoubtedly bring "a single record" (it is important to keep two or more records with the same id in a table whose id field was declared as the primary key).
Therefore, we will execute what follows only once:
$row = mysql_fetch_array($package);
And we will have already loaded the array $ row with the complete data of that record, as they were stored in the table.
We could go declaring the basic tasks of this new function editRecord:
<?php
function editRegister($data){
// We will extract the record from $row:
if ($row=mysql_fetch_array($data)){
// Here we will accumulate in $code each data of $row located within field value attributes
} else {
$code = false;
}
return $code;
}
?>
Now comes the most complicated part: our function must generate an HTML form that within its fields shows written all the data that are currently inside the $row matrix.
Let's see how to do it.
The most convenient way to create this form is to generate its code using an HTML editor, careful that its action attribute points to a page (that we have not yet created) that we will call modified.php
This form will contain five input fields of type text (the id field does not count because we will not allow it to be modified), and a button to send.
As soon as we have created the HTML code of this form with our editor, we will paste it into our editRecord function, immediately after transferring the $ data content to $row.
We will paste the code of the form within the variable $ code, whose value we will delimit it with single quotes (due to the abundant double quotes that must wrap the values of the attributes in the HTML code). Our function for now is staying like this:
<?php
function editRegister($data){
// We will extract the record from $row:
if ($row =mysql_fetch_array($data)){
// Here we will accumulate in $code each data of $row located within field value attributes
$code = '<form action="modified.php" method="post">
<fieldset><legend>You can modify the data in this record:</legend>
<p>
<label>Name:
<input name="name" type="text" />
</label>
</p>
<p>
<label>Last name:
<input name="lastname" type="text" />
</label>
</p>
<p>
<label> Age:
<input name="age" type="text" />
</label>
</p>
<p>
<label>Country:
<input name="country" type="text" />
</label>
</p>
<P>
<label>Spatiality:
<input name="spatiality" type="text" />
</label>
</p>
<p>
<input type="submit" name="Submit" value="Update" />
</p>
</fieldset>
</form>';
} else {
$code = false;
}
return $code;
}
?>
This is just a basic code to begin with.
Let us not forget that this form must show the writings, within each field, the values of the record that will be modified, that we already have them stored within the $row matrix.
If we want, we can try to include a call to this function within our page modify.php, so we see how the form shows (although empty), this will be the final code of the page named modify.php:
<?php
// We include the connection data and functions:
include("connect.php");
include("functions.php");
// Verify the presence of the expected code:
if (isset($_GET["code"]) and $_GET["code"]<>""){
$code=$_GET["code"];
// We connect:
if (connectBase($host,$user,$password,$base)){
$query = "SELECT * FROM employees WHERE id='$code'";
if ( $package = consult($query)) {
// Here we will call a function that shows that data within value attributes of a form:
$result=editRegister($package);
echo $result;
} else {
echo "<p>No data found</p>";
}
} else {
echo '<p>It has not been indicated which registry you want to modify</p>';
}
echo '<p>Back to href="listing.php">listing</a></p>';
?>
If in the list we click on any of the links that say MODIFY, for now we will see the empty form:
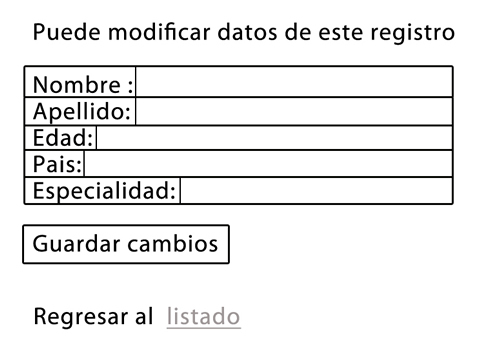
The edit form, without the data yet.
We return to our editRecord function.
To write the missing data inside the form, we must concatenate the different $ row fields within the input layer value attributes.
Before doing so, we will pass them to local variables, to avoid problems with the quotes; in passing, we will encode in UTF-8 the data brought from the base:
$currentName = utf8_encode($row["name"]);
$currentLastname = utf8_encode($row["lastname"]);
$currentAge =$row["age"]; //Age is a number
$currentCountry = utf8_encode($row["country"]);
$currentSpatiality = utf8_encode($row["spatiality"]);
//We will replace the variable $complete code with this new code where we already include the data:
$code = '<form action="modified.php" method="post">
<fieldset><legend>You can modify the data in this record:</legend>
<p>
<label>name:
<input name="name" type="text" value="'.$currentName.'"/>
</label>
</p>
<p>
<label>lastname:
<input name="lastname" type="text" value="'.$currentLastname.'"/>
</label>
</p>
<p>
<label>age:
<input name="age" type="text" value="'.$currentAge.'"/>
</label>
</p>
<p>
<label>country:
<input name="country" type="text" value="'.$currentCountry.'"/>
</label>
</p>
<p>
<label>spatiality:
<input name="spatiality" type="text" value="'.$currentSpatiality.'"/>
</label>
</p>
<p>
<input type="submit" name="Sudmit" value="Save Changes"/>
</p>
</fieldset>
</form>';
Now, we will see the current data written within each field, ready to be modified by the user:
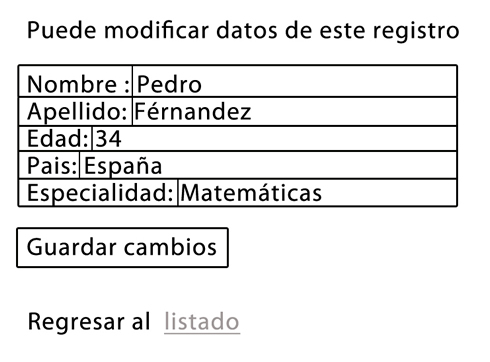
The editing form with the current data loaded in each field.
For this form, as up to this moment, it will only send the variables "name", "surname", "age", "country" and "specialty" to modified.php
How will you know, then, the SQL order that we will execute on that final page (modified.php) -which will already contain a WHERE-, to which record should the data update? Good question.
Until now, you will have no way of knowing what record to update.
We must make this form also send the registration code (id) that will be updated.
Then, we will add an input field more, but that, unlike the others, it will not be completed by a user, but its value will be defined by ourselves within a hidden field (an input of type hidden), which we will put as name "code", and whose value we will write it using the value of the code that we are editing, that is, the one that in this page we have stored even within $row ["id"])
We will add the following line in the place where we passed local variables:
$currentCode = $row["id"]
And we will add one more input within the code of the form:
<input name="code" type="hidden" value="'.$currentCode.'"/>
With this, our page modify.php is finished and, our function editRecord, too.
Let's now codify the last page, modify.php, which is the one that will finally execute the SQL command that will use the current values and change them by the new values entered by the user in the form that we just created.
The UPDATE command of the SQL language
On the last page of this process, modified.php, along with the other variables of the form, we will be arriving at the code that we passed through hidden input, so we are ready to execute the update (of course, we will validate if we actually get each data , and if it is not empty)
This is the syntax of the SQL command that performs the update of the values of a record:
UPDATE table SET field='value' WHERE field'value';
Attention:
In the same way as in the DELETE order, it is fundamental to specify a WHERE, since otherwise the values entered by the user will be applied to all the records in the table and they will all remain the same.
In our example, after transferring all the data received from the $ _POST matrix to local variables, the UPDATE order will remain as follows:
UPDATE employees SET name = '$name', lastname = '$last name', age = '$age', specialty = '$specialty' WHERE id = '$code';
For this reason, the complete code of the last page (modified.php) of our system of registrations, cancellations and modifications, will be:
<?php
// We include connection data and functions
include ("connect.php");
include ("functions.php");
// We verify the presence of the expected data (we should validate its values, although here we do not do it for short):
if (isset($_POST["name"], $_POST["lastnames"], $_POST["age"], $_POST["spatiality"], $_POST["code"]) ){
// We connect:
if (connectBase($host,$user,$password,$base)){
// We avoid problems with encodings:
@mysql_query("SET NAMES 'utf8'");
// We move to local variables to avoid problems with quotes:
$name = $_POST["name"];
$lastname = $_POST["lastname"];
$age = $_POST["age"];
$country = $_POST["country"];
$spatiality = $_POST["spatiality"];
$code = $_POST["code"];
$query = "UPDATE employees SET name='$name', lastnames='$lastnames', age='$age', country='$country', spatiality='$spatiality' WHERE id='code'";
if (mysql_query($query)){
echo"<p>Record updated.</p>";
}
else {
echo"<p>Could not update </p>";
} else {
echo"<p>Service interrupted</p>";
}
} else {
echo '<p>It has not been indicated which registry you want to modify.</p>';
}
echo '<p>Back to <a href="listing.php">listing</a></p>';
?>
From this moment, we are ready to interact from any of our PHP page with information stored in databases, performing the four basic operations: read, add, delete or modify data.
Radiography of a system with back-end and front-end
Think of any of the Web systems or applications that we use every day: an electronic commerce system, a home banking, a weblog to publish news, a virtual campus, a social network.
All these systems have a common architecture: they are composed of a double interface, that is, they have two completely different "zones": a page area for the use of clients / students / etc., And another series of pages for private use of the owner / administrator of the system.
Since all the contents of this type of dynamic Web sites are stored in a database, they are the core of the system.
The chain of production of the contents of the database will normally be:
Administrator → Database → users
Although it could also be that the same users contribute data:
users → Database → users
And why not:
users → Database → Administrators
(It could be that users write support or consultation messages for administrators).
The tool with which these administrators will interact to load contents in the database, will be a series of pages protected with a password, from which they will choose to see a list of contents (products, accounts, students, courses, news, etc.) and they will use forms like the ones we learned in this article to register new contents, modify them or delete them (CRUD tasks).
This is the back-end (the "behind the scenes" site)
On the other hand, users will interact with the same information, but from another series of pages, which may be public or restricted access, but in which the permitted actions are much more limited: each user can only see "his" information ( your purchases, balances, courses, comments, etc.) and you can only add that information that "belongs to you" (your orders, your messages, your tasks, etc.).
This is the front-end. The pages through which the user navigates.
We will take as an example to analyze it step by step (without coding it) a system of orders, in this occasion, for the website of a Pizzeria.
It will be very easy to reuse it with slight changes for other types of business, since the circuit of receiving an order usually has very few variants between one business and another.
We need to start by making a list of the tasks that each type of user will perform (we can show them visually as usage case diagrams).
Then, from these use cases, we will deduce which pages will need to be created to navigate through each use case, and which will be the main functions that will need to be defined.
We will deduce how many tables we will have to create in the base and what will be the main fields and their data types.
Front-end: the user's point of view
Imagine above all the tasks of that customer who will try to buy something using this system.
To do this, let's take the side of the client (buyer):
What processes are necessary to send pizza to our house?
The process could consist of going through the list of products to choose the ones that we like the most, and then transmitting our name, address, a telephone number, the detail of the order - the quantities of each product, drinks, desserts etc. - and some extra comments that we consider necessary to add (for example: "touch the red bell").
It may be that, then, we are confirmed the total amount of the order, and we are asked how much we will pay (to bring the change or just change).
In this way, they will indicate that the order is already taken and, perhaps, even give us an order code, with which we could check the status of the order in case of delays.
In short, we could find these tasks:
- See list of products
- Complete order form
- Receive order code
- Review order status
If we think about the pages that will allow us to perform those tasks:
- list.php
- form.php
- add.php
- ask-state.php
- see-state.php
And if we think about the functions that will be necessary, we could imagine at least the following:
- connectBase
- Consult
- tabular
- seeState
Rereading the list of pages, we see that with the first three functions, we can see the list of products for sale.
Then, to show the order form we do not need any function (unless we wanted to create one to validate the data entered, which would surely be very practical).
To add the order to the base does not require a function, and the same to enter the code of the order in a form and check its status, although if the function seeState would be required to deliver the requested order status.
All these functions will interact with the database.
Therefore, we have to discover what are the key concepts of what we will have to show or store information.
In this system, we can identify two major concepts: the one of the products that will be shown for sale, and the one of orders that will be received.
These will then be the two tables the system could have (since it could have more, such as a table of registered users, etc. But we decided to keep it simple to go more easily reasoning that it is necessary and that it is an accessory).
The product table could contain fields such as:

And the order table could contain:
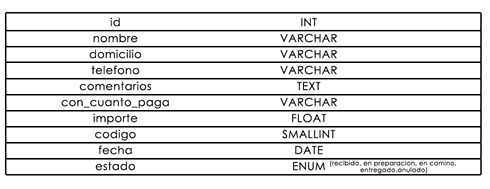
Technically thinking that part of the ABM process will be done by the user of an order form, you will first see the list of products.
To do this, perform a SELECT. Then you will see a form and, when you submit it, you will make an INSERT in the order table. Register a record.
Then, if you want to check the status of your order, you will enter a form and, upon submitting it, will do a SELECT.
We can outline it by means of a diagram of things of use:
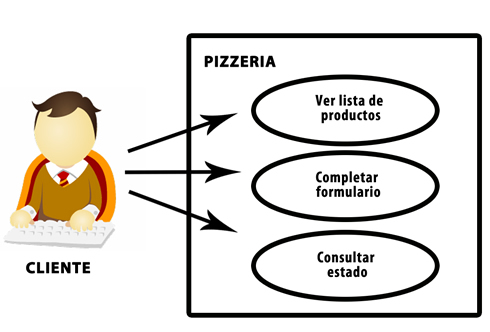
Customer use case diagram.
In this diagram, we include the task of consulting the status of the order, which will be done by the user in the pages ask-state.php and see-state.php, introducing in the first of them the code that was generated when placing the order.
Now let's go to the other side of the counter.
List of administrator tasks
On the other hand, an operator (administrator) will be in charge of receiving a notice (it could be an email sent automatically when a new order is placed), print the order and pass it on to the employee or cook who will physically prepare the box with the order.
At that time, I could enter the system and change the status of that order, which was initially "received"; indicating that it is now in "preparation" (and an automatic email could warn the user of this change).
Once the order comes out of the kitchen and is delivered to the motorcycle boy, the order status could be changed to "on the way".
When the motorcycle returns confirming that it was delivered, we will change the status to "delivered". If for some reason the order has to be canceled, the status will be changed to "canceled".
All these changes of status can be made by the administrator from a series of restricted access pages, where user and password are requested, and used to validate access.
For the system operator, their tasks will be to add new products (or eliminate them), update prices, see list of orders (ordered from the most recent to the oldest, or those that have a status of "on hold") and change the status of an order.
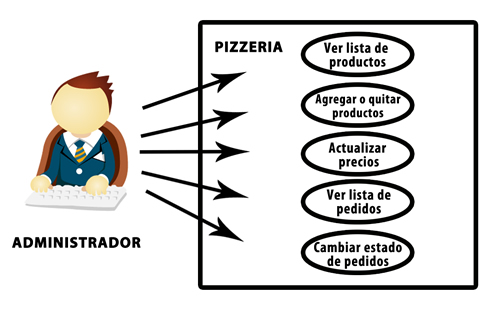
Diagram of administrator use cases
That is, technically, it will request listings (SELECT queries), perform updates (UPDATE) and register new products (INSERT) or delete them (DELETE).
Once the logic underlying this system is understood, we can easily extrapolate to almost any other system that can occur to us.
The logic is always the same add data to the base, modify them, delete them and show all or only part of that data.
This is the outline of most free software projects: all of them with their back-end and their front-end. Now, before knowing what are the most useful of these systems.
CITE ARTICLE
For homework, research, thesis, books, magazines, blogs or academic articles
APA Format Reference:
Delgado, Hugo. (2019).
Taking data from PHP pages to the base in MySQL.
Retrieved Nov 11, 2025, from
https://disenowebakus.net/en/php-mysql-crud

