Creating the first database with phpMyAdmin in MySQL
In order to create our first database, we can interact with phpMyAdmin. In case you have used the XAMPP, EASYPHP or APPSERV the URL that we write will be.

In order to create our first database, we can interact with phpMyAdmin. In case you have used the XAMPP, EASYPHP or APPSERV the URL that we write will be:
http//localhost/phpmyadmin/
Depending on the emulator, it will ask us to identify ourselves with a MySQL user and password, in some cases the user is usually "root" and the password is empty, in other cases the user and password are declared during the installation.
Once identified, we will be allowed access to the phpMyAdmin. Bear in mind that if we do not use the base for more than 1440 seconds (24 minutes) it will ask us to enter our username and password again for MySQL.
With the phpMyAdmin open, the first thing we are going to do now is create a new database (many hostings already have one pre-installed, so in those hostings we will skip this step, and directly use the base that already exists).
Instead, locally (in our test server) we can create a new database for each project we are working on.
To create a new database, within the phpMyAdmin we will write (in the zone that is highlighted below) the name that we want to give (we will name it "courses"):
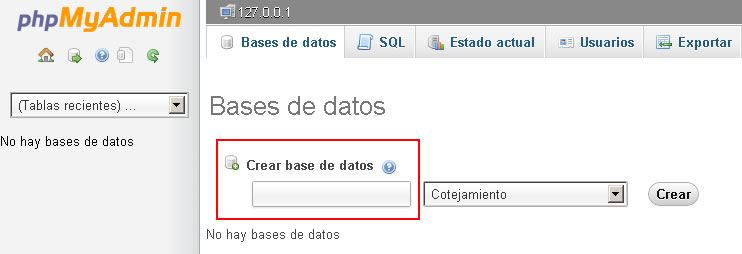
Let's do, step by step, what this example shows: within the text field we write courses (in lowercase letters), that will be the name of our new database.
After writing the name, we choose the character set that we will store (for texts in Spanish it will be utf8_spanish_ci, which corresponds to traditional Spanish, and allows us to use the ñ and the ch and ll).
If we had to create a base for a Korean customer, Japanese, Arabic, Chinese, ect; we must choose the corresponding character set:
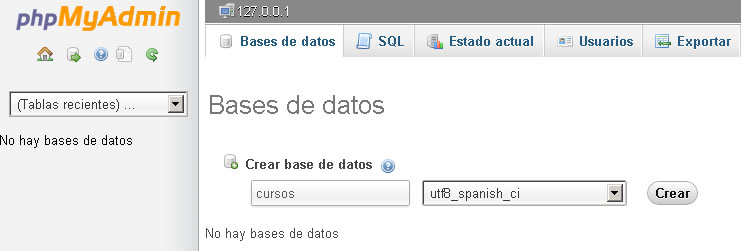
Finally, click on the Create button and then the name of the newly created database will appear in the column on the left, below the selection world that shows all the databases that we have on our server, as well as the name of the active database in the top path (breadcrumb or bread crumbs) that always indicates where we are standing:

Surely, we will agree that it has been very easy. We have already created our first database.
But before moving on, let's check what happened on the "physical" level of our hard drive by creating this new base.
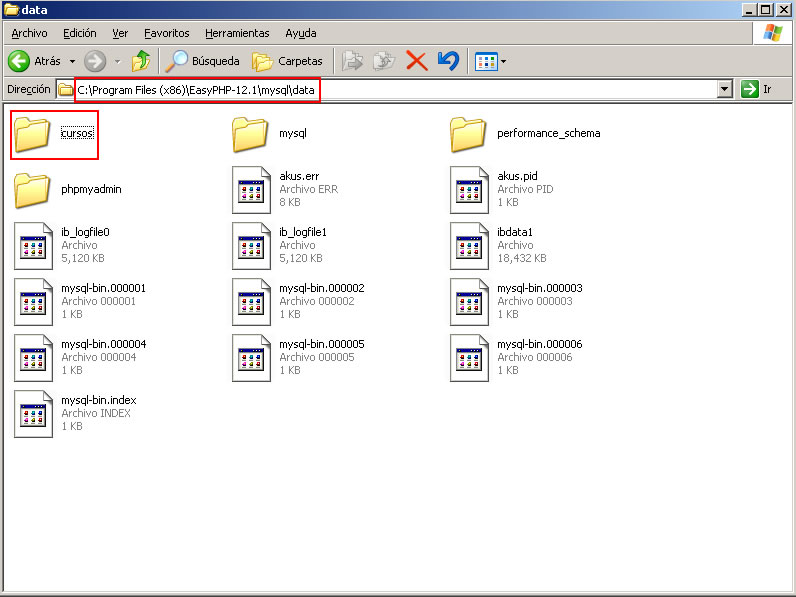
If we have used the XAMPP we can enter with the program My PC (or any other file explorer), until you reach C: / server / XAMPP / mysql / data / and there we will find a folder for each database that we have created; in this case, we see, next to the bases that come by default, our new base "courses":
Nota:
The route may vary based on the emulator you are using
Create a table
At this point, we are ready to create our first table in our brand new database (remember that a database is a simple folder that organizes our tables, but the places where the data is actually stored are the tables).
To do this, first we will click on the left column, on the name of the base within which we want to create a table (our base called "courses" does not yet have any tables created).
This will reload the right part of the screen, and we will see a message warning that there are still no tables in the base:

Now we can create a table very easily in the database, simply by writing the name of the table we create and the number of fields (columns) we want it to have.
This will be indicated in the form fields highlighted in the previous figure.
As a first example, we will create a table called "messages" whose purpose will be to store the name, email and a message that users will leave in a typical query form on our website.
That is, at first glance it would seem that the new table would only need to have three fields, one for each data it will store (name, mail and message); but in the databases always use an extra field, whose value should be unique in each record, always different, constituting a code that will identify each record unequivocally and unrepeatable. This extra field is usually called id (since it fulfills the identifier function of each record), so we will have four fields: id, name, email and message.

After pressing the Continue button, the following screen will appear, in which we will have to write the names of each of the four fields or columns that our table will have. Let's do it step by step.
1. In the first text field, just below the title that says "Field", we will write the name of each field (id, name, email, message), in that order, one below the other, all in the first column.
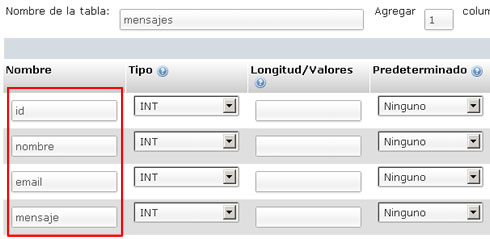
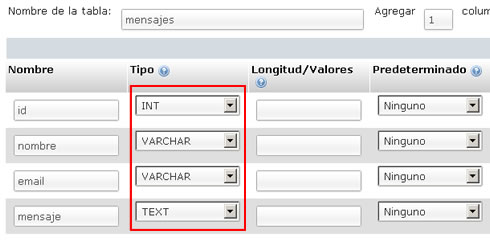
2. In the second column, called Type, we will choose the type of data that each of these fields can store. We will soon see other possible data types, but for now let's advance that the most commonly used data types are INT (integer, that is, integers, without decimals, such as those required by the id field), VARCHAR (character variable or variable characters, which stores letters and numbers, up to a maximum of 255 characters, such as those required for the name and email fields), and TEXT (for texts greater than 255 characters, such as those in our message field). So we will choose these types of data in the "Type" column:
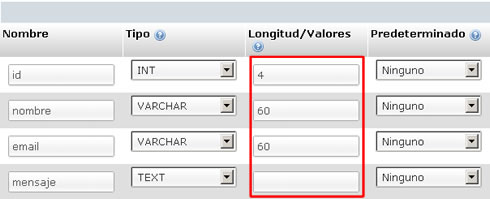
3. In the third column, we will define the maximum number of characters that each field will store (four digits for the id- we assume that we will never have more than 9999 messages-), 60 digits for each "name" and each "mail", we will add that In the fields of type TEXT as "message" we should not put anything in length, since it should be empty.
4. Now we move to the right of the screen. In the Null column, if we leave the checkbox unchecked, we will make that field is NOT NULL; that is, it will be mandatory that we complete some value when we add a record.
If we do not want this to be obligatory and that can be left empty and that the complete record be added with the rest of the fields that had been completed, then we mark that selection box, which is equivalent to defining that field as potentially NULL, I mean it can be null or empty.
For now, we determine all the fields as NOT NULL, that is, no null values (empty spaces) will be allowed in any of the fields when we intend to insert a new record.
For that, we have nothing to do, since by default the boxes are unchecked:
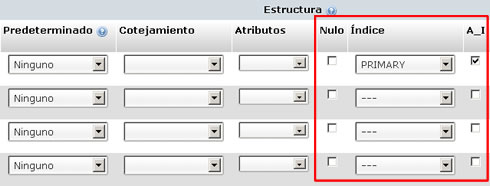
5. Now, exclusively in the reglon belongs to the id field (the first one) we must choose in the Index column the Primary option, as we go in the previous image, which indicates that this field will be the one that will identify each record in a unique way. your primary key.
In addition to the side of the selection menu, we will mark the box with the abbreviation A_I (Auto Increment), which makes the content or "value" of this field id, be automatically completed each time we add a record, with numbers that will increase one by one, never repeated.
We will not worry about now, but we can capture all these details, we will return to them in future examples
6. Now press the Record or Save button.

And once this is done, we have our first table completely ready to use!
Next, we will carry out with it the most necessary processes in a database: add, modify and delete data.
CITE ARTICLE
For homework, research, thesis, books, magazines, blogs or academic articles
APA Format Reference:
Delgado, Hugo. (2019).
Creating the first database with phpMyAdmin in MySQL.
Retrieved Nov 13, 2025, from
https://disenowebakus.net/en/create-database-phpmyadmin-mysql


